![[IUCr Home Page]](../iucr-top/logos/iucrhome.gif)
![[Crystallographer's Guide to Internet Tools and Resources]](intguide.gif)
There exist a number of different GUIs (Graphic User Interface). They all work on the same principles. We will comment one of the most popular one which exists on Windows 3.1 systems. It is made of two main screens:
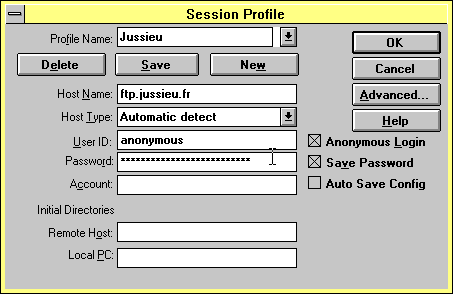
When clicking on the FTP icon, the following screen is displayed:

One indicates the remote machine name in the Host_Name field (ftp.jussieu.fr in this example). The user identification on the remote computer must be written in the User ID field as well as the password in the next field. Note that the password is masked with *****.
It is possible to save all the information in a profile by giving a Profile Name (Jussieu in this example) and saving it. It is also possible to save the password in this profile. This is useful for anonymous ftp as the password is your e-mail address. This facility should never be used for FTP connections to personal accounts since it would allow any user of the PC to establish a connexion just calling this profile.
It is also possible to choose a local directory on the PC as well as a remote directory. Otherwise the starting directory is the ftp directory on the PC, the home directory on the remote machine.
If something goes wrong (wrong password, wrong user identification) the user is prompted and must correct the information.
The Advanced option must be used if the remote site is accessible through a firewall. You must give information about it. This may be difficult and may require the help of a specialist.
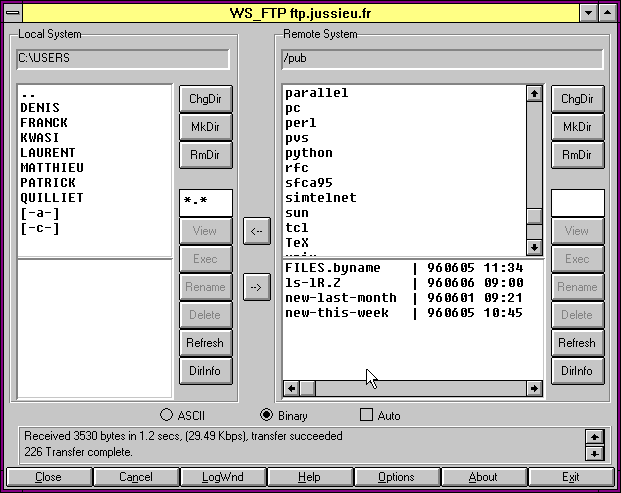
Once connected the following screen is displayed:

File information about the local computer (PC) is displayed on the left side. The local directory is displayed at the top (C:\USERS in this example). The list of all the sub-directories appears below (DENIS, FRANCK...). The second part of this window is left blank since no files are stored directly under the directory C:\USERS.
The information about the remote files is displayed on the right. The remote directory is /pub. The upper part of the window displays all subdirectories, the lower part all files stored directly under the directory /pub.
In both parts it is possible to change the current directory, to create a new directory, etc... by pushing the corresponding button.
File exchange is activated by pushing the proper arrow between both screens after selection of files with the mouse.
The file format is chosen by clicking the correct button at the bottom of the window. ASCII or binary formats may be chosen as well as an automatic recognition of the contents of the files. This last possibility depends on the configuration of FTP, activated through the Options button, and may require additional software for format conversion.
The number of exchanged bytes and the status of the transfer are displayed at the bottom.